Quick Start
What is Kintone UI Component?
Kintone UI Component is a library that enables Kintone developers to build forms with Kintone's styling with ease.
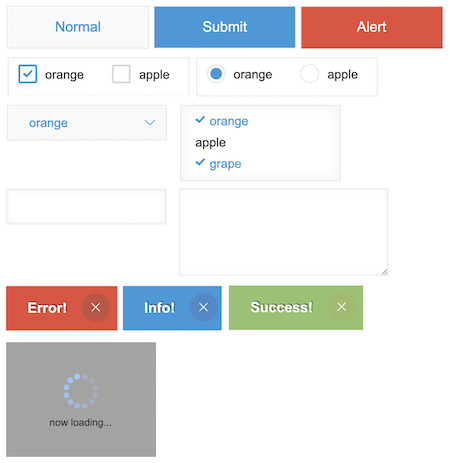
Example for Desktop components
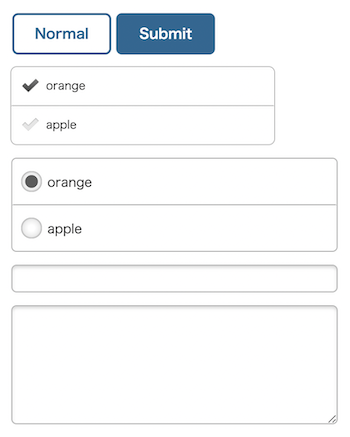
Example for Mobile components
Preparation: Create App
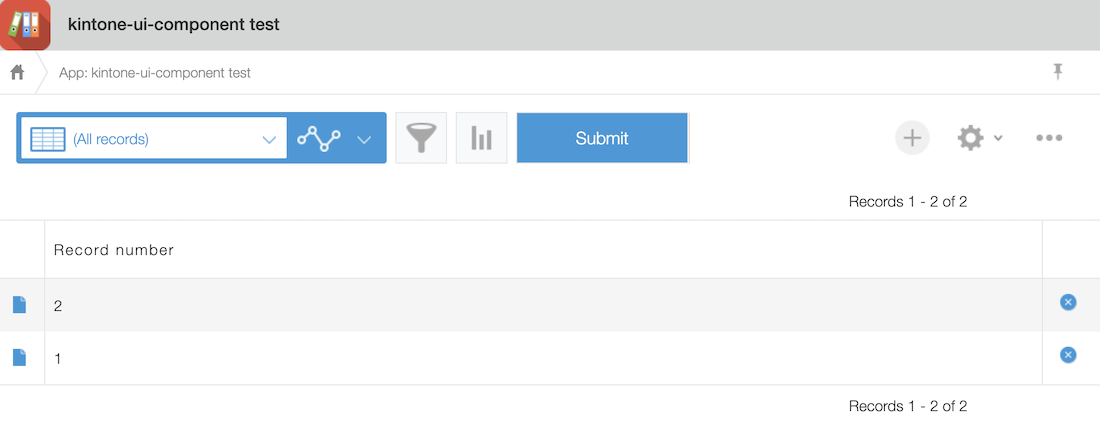
In this tutorial, you will place a Button component inside the header menu space on the Record List page of a Kintone app.
First, follow the below steps to create an app to install Kintone UI Component.
- Create a blank app. (Creating an App from Scratch)
You do not need to set up any fields in this app.
Installation
Kintone UI Component supports installation via a UMD, a CDN, or a npm package.
You can choose to import or implement the library according to the environment such as the browser environment or Node.js environment.
In this article, we will show you how to install and implement using each approach.
We recommend that you should upgrade Kintone UI Component to the latest version for your projects.
See the Components section in the sidebar for more details on each component.
(Additional components will be added in order.)
Use the UMD
When using a version on and after v1.4.0, please use Kucs["1.x.x"] instead of Kuc and specify your expected version (ex. new Kucs["1.4.0"].Button()).
The rendered components' tags and class names will include the version number.
You may still use Kuc as a global variable but note that it may be conflicting when adding two or more kuc.min.js files on Kintone customization or plug-in. In this case, the Kuc object refers to the last loaded kuc.min.js file.
In case that there is only one kuc.min.js file in the Kintone system or there is no problem with using last loaded kuc.min.js file, you can use Kuc object. Please remove const Kuc = Kucs['1.x.x']; line.
When using a version before v1.4.0, please use Kuc as a global variable but note that it may be conflicting when adding two or more kuc.min.js files on Kintone customization or plug-in.
Please read this Version conflicts issue and solution article for more information!
- Download the file located inside Kintone UI Component repository's each version Release field. Unzip the attached archives folder (kintone-ui-component-{version} .tgz). Upload the following file to the
JavaScript and CSS Customizationinside Kintone's app setting.
./umd/kuc.min.js
- Create a
index.jsfile.
If you only have one kuc.min.js file in your system, or you are okay with using the kuc.min.js file loaded last, you can remove the "const Kuc = Kucs['1.x.x']" line.
const Kuc = Kucs['1.x.x'];

kintone.events.on('app.record.index.show', event => {
  const header = kintone.app.getHeaderMenuSpaceElement();

  const button = new Kuc.Button({
    text: 'Submit',
    type: 'submit'
  });
  button.addEventListener('click', clickEvent => {
    console.log(clickEvent);
  });

  header.appendChild(button);
  return event;
});
- To apply the customization, upload
index.jsfile to theJavaScript and CSS Customizationinside the Kintone app settings. (Customizing an App with JavaScript and CSS)
Use the CDN
See the guidance and sample code at Use UMD section.
-
Add the following CDN URL into the
JavaScript and CSS Customizationof a deployed Kintone app. (Customizing an App with JavaScript and CSS)
Once the CDN is being imported to the app, you will have access to the global object ofKuc.-
For the latest version of Kintone UI Component:
https://unpkg.com/kintone-ui-component/umd/kuc.min.js -
If you want to import a particular version, specify the version number after the project name.
https://unpkg.com/kintone-ui-component@1.0.0/umd/kuc.min.js
-
-
The following is the same as the UMD.
unpkg is not a CDN service provided by Cybozu. It is recommended that you use this for verification.
In the production environment, you can use the kuc.min.js of the UMD to avoid any failures and problems related to unpkg.
Use the npm package
When using on and after v1.4.0, rendered components' tags and class names will include the version number.
Please read this Version conflicts issue and solution article for more information!
- Create a folder name
customization, and move your root into the folder, then execute the following command:
mkdir customization && cd customization
npm init -y
npm install kintone-ui-component
npm install webpack webpack-cli --save-dev
If necessary, install babel-loader and css-loader.
- Import the components you want to use, and create a
index.jsfiles undersrcfolder.
import { Button } from 'kintone-ui-component/lib/button';

kintone.events.on('app.record.index.show', event => {
  const header = kintone.app.getHeaderMenuSpaceElement();

  const button = new Button({
    text: 'Submit',
    type: 'submit'
  });
  button.addEventListener('click', clickEvent => {
    console.log(clickEvent);
  });

  header.appendChild(button);
  return event;
});
- Add the following
webpack.config.jsfile into the root:
const path = require('path');
module.exports = (env = {}) => {
  return {
    entry: {
      customization: './src/index.js'
    },
    output: {
      path: path.resolve(__dirname, 'dist'),
      filename: '[name].min.js'
    }
  };
};
- Add webpack build script into
package.json.
"scripts": {
  "build:webpack": "webpack --mode production",
  ...
}
- Execute the following command to generate a file for customization:
npm run build:webpack
Output Result:
./dist/customization.min.js
- Upload the bundled file created in the previous step to the
JavaScript and CSS Customizationoption inside Kintone app settings. (Customizing an App with JavaScript and CSS)
Browser support status
| Chrome | Safari | Firefox | Edge |
|---|---|---|---|
| ○ | ○ | ○ | ○ |
The components have been tested in the latest version of each supported browser.
You can preview the components in the Overview section in each component's reference page.